Getting started
Before we dive in, the most important bits to remember:
- The Compute Module 4 is in all relevant aspects identical to a Raspberry Pi 4 when it comes to software. What works on a Pi4 work on a CM4.
- USB is disabled by default in the vanilla Raspberry Pi OS and needs to be enabled in
/boot/config.txt. - You don’t need to set anything up with our modified OS image. Otherwise checkout our reference config.txt.
If you have any questions please don’t hesitate to reach out to us on Discord!
Getting started the quick way
We prepared a customized version of Raspberry Pi OS that has everything installed and configured for Piunora and electronics prototyping.
Download latest Piunora Raspberry Pi OS Desktop image
Default user: pi
Default password: raspberry
Please change the password immediately, unfortunately this is how Raspberry Pi OS is currently setup. You can do this during flashing as explained below or the first boot experience will guide you through it if you connect via a monitor.
It is based on the latest “Raspberry Pi OS (32 bit) with Desktop”. It behaves just the same way and has the same “first boot” experience with all the dialogs to get you setup if you are new to the Pi.
We highly recommend using the Raspberry Pi Imager to flash your image. You can download it here
- Download for Windows
- Download for Mac
- Download for Ubuntu (.deb) or
sudo apt install rpi-imager
If you have a CM4 model with eMMC, please check out the instructions below and come back. Flashing works largely the same but you can not use an SD card at all on eMMC models, the SDcard interface is not present on eMMC models.
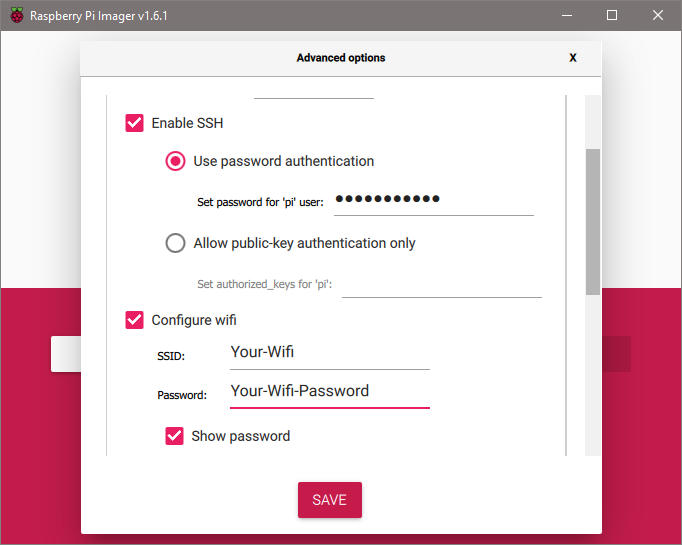
Before flashing the image we recommend checking out the advanced settings tab which can be opened with the key combination Ctrl+Shift+X. This will open a little window where you can set your WiFi credentials and enable SSH + set a new password. We highly recommend setting at least these two things up so you can access you CM4 via SSH! We chose to not enable SSH by default for the same reason as Raspberry Pi, SSH enabled with a default password is dangerous. Do change the password here (its the most convenient) or at the very latest after your first boot if you are for some reason not to using the Pi Imager tool.
For eMMC models only
If you are using an eMMC module you can checkout the official Raspberry Pi docs for flashing CM4 modules with eMMC.
They will the be most up to date but given they are a bit convoluted here is a more concise run down of how to proceed. Note that any instructions specific to setting USB boot on a CM4IO board in the official Raspberry Pi guide do not apply to Piunora, see below for how this works on Piunora.
The eMMC can be mounted as a Mass Storage device to your computer via USB, it will look like you just inserted an SDcard.
In order to make that happen we need the Raspberry Pi usb boot utility, this will tell the CM4 to attach the eMMC as a Mass Storage device to our computer.
Getting the rpiboot binary
As Raspberry Pi is not releasing binaries for this usb boot utility for Mac and Linux we created this CI pipeline to build the latest version for you. It also offers the latest installer for Windows which is ahead of the last released installed by Raspberry Pi. We highly recommend going with that version as it includes some important fixes for USB hubs. On MacOS compiling turned out to be a bit tricky for some users. You may want to still try to compile from source but if that gives you issue the binaries might help.
Latest downloads for binaries.
On MacOS you will still have to install libusb via the brew package manager brew install libusb
It is not compiled without an Apple Developer certificate. So in order to run it you may need to remove the quarantine bits that MacOS sets on unknown binaries: xattr -d com.apple.quarantine ./rpiboot
If you do not trust our binaries you can still compile from source, it is not very complicated if you used cmake before.
We will try to work on a more beginner friendly solution for the future.
If you are on Linux the best way is to build rpiboot yourself.
Connecting Piunora to your PC and mount the eMMC
Now that we have the rpiboot tool we can put the CM4 into USB boot mode.
If you can’t see it on Windows use the start menu search to look for rpiboot
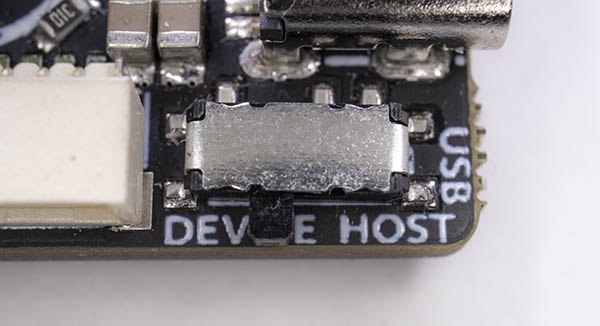
The USB switch (near the USB-C connector) must be set in the DEVICE position. The Device position is the one closer towards the small Qwiic connector. The default position is Host which is facing away from the Qwiic connector towards the USB cable.
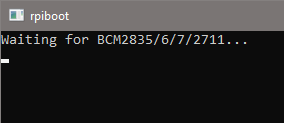
Now run the rpiboot binary, it will start to search for attached CM4 devices.
Holding down the USB boot button while attaching the USB-C cable will enable USB boot. This button is connected to both GPIO25 and the nRPI_BOOT signal for USB boot. Physically it is located on the top left behind the HDMI connector.

You do not need to keep holding it down after attaching the USB cable, it just needs to be pressed during power up.
After a few seconds you should see the USB device disconnect and come back as a Mass Storage Device.
The rpiboot utility will automatically close/exit.
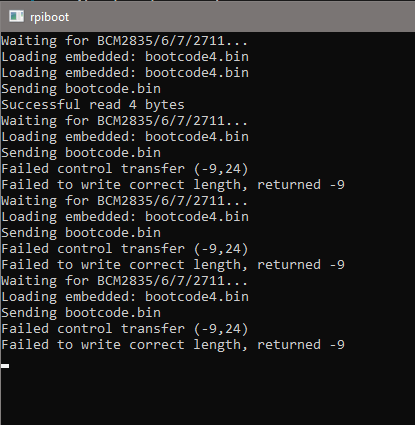
USB hubs sometimes can give you issues when the rpiboot utility tries to send the boot code. If you experience the tool going in a loop forever trying to send something, try a USB port that is directly connected to your computer or a different USB hub.
It may look something like this. Spewing errors of failed control transfers.
Using an existing Raspberry Pi SD Card or vanilla Raspberry Pi OS
You can of course boot any OS you like!
The only thing you probably wanna do at very least is copy our Piunora/CM4 specific config.txt. You can find the latest version here.
This enables things like extra SPI ports needed for ADC, enables USB and other things necessary to interface with hardware. You can just copy the Piunora section, you don’t have to overwrite your whole config.txt if you don’t want to. Just make sure you don’t disable anything again by accident.
For a comprehensive overview of what we install for Piunora you can check out the repository for the automated image build process.
https://github.com/Diodes-Delight/piunora-raspberrypi-os-image/tree/main/scripts
It contains all the shell scripts for all the features we add. You can run them manually on your installation but no guarantee it will work fine, it is only tested against the latest version of Raspberry Pi OS (Debian based).